State Pattern in Rust
The “State” pattern is a behavioural design pattern that allows an object to alter its behaviour when its internal state changes. In Rust, like in other programming languages, you can implement the State pattern to encapsulate different states of an object and manage the transitions between those states.
Ok what does that actually mean?
Fast Cloud Linux VPS Hosting
The ‘State‘ pattern is a design pattern used in software development to manage the behaviour of an object when its internal state changes. Instead of having one big chunk of code that handles all possible states, you break it down into smaller pieces of code, each representing a specific state. Then, you switch between these pieces of code (states) as needed, making your code more organized, modular, and easier to maintain. It’s especially useful when you have objects with multiple behaviours that can change dynamically based on their internal state, like a game character with different actions.
Check out "Learning Rust" channel on YouTube

An example of the ‘state pattern’
Imagine you have a video game character that can do different things like walk, run, or jump. Instead of writing complex code to handle all these actions in one place, you can use the State pattern.
Each action (walking, running, jumping) is like a different “state,” and you create separate pieces of code for each state. Then, when the character needs to do something, it just switches to the right “state,” and the code for that state takes care of everything. It keeps the code organized and makes it easy to add or change actions without messing up the rest of the character’s behaviour.
Here are the steps to implement the State pattern in Rust:
Define a trait for the states:
- Create a trait called
State. - Define a method, such as
handle, within the trait to represent the behavior associated with each state.
Create concrete state structs:
- Define state structs (e.g.,
StateA,StateB) that implement theStatetrait. - Implement the
handlemethod within each state struct to provide state-specific behavior.
Create a context struct:
- Define a struct (e.g.,
Context) that holds a reference to the current state. - Implement methods within the context struct:
newmethod to create a new context with an initial state.transition_tomethod to switch between states.requestmethod to invoke the behavior associated with the current state.
Use the State pattern:
- Create instances of state structs (e.g.,
state_a,state_b) and a context (context). - Initialize the context with an initial state (e.g.,
state_a). - Call the
requestmethod on the context to trigger state-specific behavior. - Use the
transition_tomethod to switch to a different state as needed.
This pattern allows you to encapsulate the behaviour of an object in different states and manage transitions between those states effectively.
Webdock – Fast Cloud VPS Hosting
Code Example
Here’s how you can implement the State pattern in Rust:
- Define a trait for the states:
   trait State {
       fn handle(&self);
   }
This trait defines a method handle that represents the behavior associated with each state.
- Create concrete state structs that implement the
Statetrait:
   struct StateA;
   struct StateB;

   impl State for StateA {
       fn handle(&self) {
           println!("Handling State A");
           // Add State A specific behavior here
       }
   }

   impl State for StateB {
       fn handle(&self) {
           println!("Handling State B");
           // Add State B specific behavior here
       }
   }
Each state struct implements the handle method with its specific behavior.
- Create a context struct that holds a reference to the current state:
   struct Context {
       state: Box<dyn State>,
   }

   impl Context {
       fn new(initial_state: Box<dyn State>) -> Self {
           Context { state: initial_state }
       }

       fn transition_to(&mut self, new_state: Box<dyn State>) {
           self.state = new_state;
       }

       fn request(&self) {
           self.state.handle();
       }
   }
The Context struct holds a reference to the current state and has methods to transition between states and invoke the current state’s behavior.
Now you can use the State pattern in Rust:
fn main() {
    let state_a = Box::new(StateA);
    let state_b = Box::new(StateB);

    let mut context = Context::new(state_a);

    context.request(); // Output: Handling State A

    context.transition_to(state_b);

    context.request(); // Output: Handling State B
}
In this example, we create two states (StateA and StateB), a context (Context), and transition between these states. When the request method is called on the context, it delegates the behavior to the current state’s handle method, allowing the object to behave differently depending on its internal state.

Summary
The State pattern is useful for managing complex state transitions and keeping the code modular and maintainable by encapsulating state-specific behaviour. Changing the state of an object changes its behaviour!
Note : In Rust, the use of Box<dyn State> is a common approach when implementing the State pattern because it provides a way to work with objects of different concrete state types through a shared trait without knowing their exact types at compile time.
* Here is an example of putting a struct into a box :
#[derive(Debug)]
struct Ins{
    num : i32
}

fn main() {
    let ins = Ins { num : 333 };

    let bins = Box::new(ins);

    println!("{:?}", bins);

}
Remember that in Rust, ownership and borrowing rules are crucial. When you put a value into a Box, it’s moved into the heap, and the original variable (my_instance in this case) can no longer be accessed, as ownership has been transferred to the Box.
See also : https://redandgreen.co.uk/static-and-dynamic-dispatch-in-rust/rust-programming/
Bonus example of ‘State Pattern’ in Rust
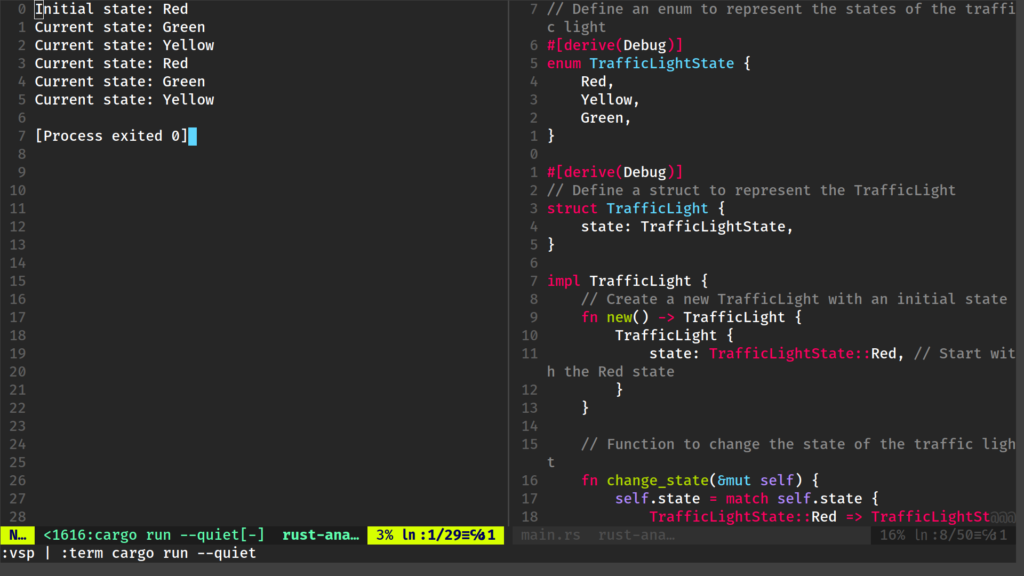
why does get_state need & before &TrafficLightState ?
In the get_state method, we return a reference to the current state of the TrafficLight object. We use & before TrafficLightState to indicate that we’re returning a reference to the TrafficLightState enum rather than moving or cloning it. This is a common practice in Rust to avoid unnecessary ownership transfers and memory copies.
Returning a reference allows the caller to observe the state without taking ownership of it. This is important because we want to retain ownership of the TrafficLight object in the main function while still being able to access its state.
If we didn’t use &, the method signature would look like this:
fn get_state(self) -> TrafficLightState {
    self.state
}
In this case, we would be returning the TrafficLightState by value, which would mean transferring ownership of the state out of the TrafficLight object. This would not be ideal because we still want to use the TrafficLight object in the main function after checking its state.
By returning a reference, we allow the caller to inspect the state without modifying it or taking ownership of it, which is a safer and more efficient approach.
Once you have read and understood all of this, try creating the code yourself?
Here is a “template”
// Define an enum to represent the states of the traffic light


// Define a struct to represent the TrafficLight

// impl
// // Create a new TrafficLight with an initial state
// // Function to change the state of the traffic light
// // Function to get the current state of the traffic light
//
//
// main
// // Display the initial state
// // Change the state and display it multiple times