Text Embedding and Upsert with Qdrant in Python
This article describes a Python script that demonstrates how to efficiently process text data, create embeddings, and upsert the embeddings into a Qdrant database using Python.
Overview
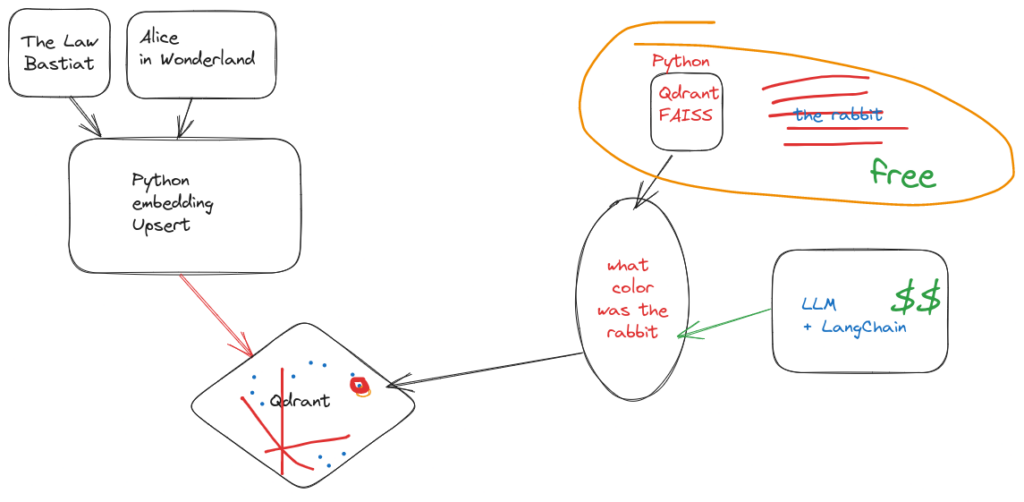
In today’s era of big data and machine learning, efficient text processing and vectorization are crucial for various natural language processing (NLP) tasks. The provided Python script showcases how to utilize the Qdrant database to handle large-scale text data, extract meaningful features, and build robust NLP applications with ease.
The script performs the following steps:
- Importing Required Libraries and Setting Up Qdrant
- Creating a Collection in Qdrant
- Text Splitting and Chunking
- Generating Text Embeddings
- Upserting Text Embeddings to Qdrant
Prerequisites
Before running the script, ensure you have the following installed:
- Python 3.x
- Docker (for setting up the Qdrant database)
Additionally, make sure to install the required Python libraries by running:
pip install langchain.vectorstores langchain.embeddings langchain.text_splitter qdrant_client numpy sentence_transformers tqdmSetup Qdrant Database
To use the Qdrant database, follow these steps:
- Pull the Qdrant Docker image:
sudo docker pull qdrant/qdrant- Run the Qdrant Docker container:
sudo docker run -p 6333:6333 qdrant/qdrantThis will set up the Qdrant database on your localhost, ready to be used.
How the Script Works
The Python script uses the following Python libraries:
- langchain.vectorstores: For interacting with the Qdrant database.
- langchain.embeddings: For text embeddings generation.
- langchain.text_splitter: For splitting large texts into smaller chunks.
- qdrant_client: For communicating with the Qdrant database.
- numpy: For efficient array manipulation.
- sentence_transformers: For generating text embeddings.
- tqdm: For displaying progress bars during processing.
Step 1: Importing Required Libraries and Setting Up Qdrant
The script starts by importing the necessary Python libraries and setting up the connection to the Qdrant database running on the localhost (port 6333).
Step 2: Creating a Collection in Qdrant
A collection in Qdrant is a logical grouping of vectors with a specified name and vector size. In this script, the collection is named “pdfz,” and the vector size is set to 384.
Step 3: Text Splitting and Chunking
Large text files (e.g., “aliceinw.txt”) are read and split into smaller chunks using the RecursiveCharacterTextSplitter from langchain. This step ensures efficient processing of large texts and facilitates embeddings creation for each chunk independently.
Step 4: Generating Text Embeddings
The script uses the Sentence Transformers model (“msmarco-MiniLM-L-6-v3”) to generate text embeddings for each chunk of the text. The embeddings are collected in batches for better memory management.
Step 5: Upserting Text Embeddings to Qdrant
Finally, the generated text embeddings and their corresponding metadata are upserted into the Qdrant database. The embeddings and metadata are converted into the required format, and the upsert operation is performed using the qdrant_client library.
Running the Script
To execute the script, ensure that you have completed the following steps:
- Installed all required libraries.
- Set up the Qdrant database using Docker.
After fulfilling the prerequisites, simply run the Python script. It will process the specified text file and upsert the embeddings into the Qdrant database.
Note: Modify the paths and filenames in the script to suit your specific use case.
Conclusion
The provided Python script showcases the power of Qdrant, combined with other Python libraries, for efficient text processing, embeddings generation, and vector upserting. By utilizing these tools, developers and data scientists can handle large-scale text data, extract meaningful features, and build robust NLP applications with ease.
For more information about the Python libraries used in the script, refer to their respective documentation:
- langchain.vectorstores: Documentation
- qdrant_client: Documentation
- sentence_transformers: Documentation