Schemars in Rust: Beyond Basic Structs

Introduction
Hello and welcome to this tutorial on Schemars in Rust! Today we’re going to explore a powerful tool in Rust’s ecosystem that helps you define, validate, and document your data structures: the Schemars library.
If you’ve worked with Rust before, you’re probably familiar with structs and their type system. But what if you need to:
- Generate JSON Schema definitions from your Rust types?
- Validate data against these schemas?
- Automatically document your API’s data structures?
That’s where Schemars comes in! In this tutorial, we’ll explore how Schemars extends beyond standard Rust structs to provide schema generation capabilities that are invaluable for modern API development.
Schemars transforms Rust structs into self-documenting, validating data models by generating JSON Schema definitions. It bridges static and dynamic typing, enabling automated API documentation, input validation, cross-language interoperability, and clear data contracts—essential for robust systems where correctness, transparency, and developer experience are paramount.
Anon
What is Schemars?
Schemars is a Rust library that allows you to generate JSON Schema definitions from your Rust struct definitions. JSON Schema is a vocabulary that allows you to annotate and validate JSON documents.
The primary feature of Schemars is the JsonSchema trait, which allows types to generate a JSON Schema representation of themselves. This is incredibly useful for:
- API Documentation: Automatically generate schema documentation for your API endpoints
- Data Validation: Validate incoming JSON against your expected schema
- Code Generation: Generate client code for other languages based on your schema
- Interoperability: Provide a language-agnostic description of your data models
Standard Structs vs. Schemars
Let’s first understand the difference between a standard Rust struct and one using Schemars:
Standard Rust Struct
// A standard Rust struct
struct Person {
    name: String,
    age: u32,
    email: Option<String>,
    tags: Vec<String>,
}
This struct:
- Defines a data structure with specific types
- Ensures type safety at compile time
- Cannot generate its own schema representation
- Has no built-in serialization capabilities
Schemars-Enhanced Struct
use schemars::JsonSchema;
use serde::{Serialize, Deserialize};

// A Schemars-enhanced struct
#[derive(JsonSchema, Serialize, Deserialize)]
struct Person {
    name: String,
    age: u32,
    #[schemars(description = "Email address of the person")]
    email: Option<String>,
    tags: Vec<String>,
}
This struct:
- Maintains all the benefits of the standard Rust struct
- Can generate a JSON Schema definition of itself
- Can include schema-specific metadata (descriptions, examples, etc.)
- Often paired with Serde for serialization/deserialization
Getting Started with Schemars
Step 1: Add Dependencies
First, add the necessary dependencies to your Cargo.toml:
[dependencies]
schemars = "0.8.12"
serde = { version = "1.0", features = ["derive"] }
serde_json = "1.0"
Step 2: Define Your Schema-Enabled Types
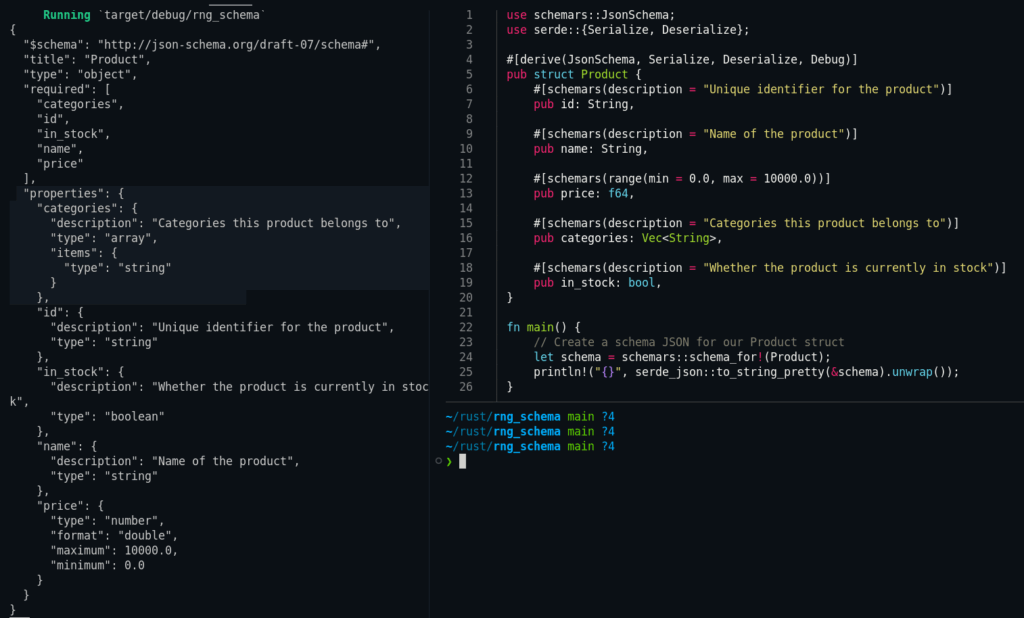
Let’s create a simple type with Schemars support:
use schemars::JsonSchema;
use serde::{Serialize, Deserialize};

#[derive(JsonSchema, Serialize, Deserialize, Debug)]
pub struct Product {
    #[schemars(description = "Unique identifier for the product")]
    pub id: String,

    #[schemars(description = "Name of the product")]
    pub name: String,

    #[schemars(range(min = 0.0, max = 10000.0))]
    pub price: f64,

    #[schemars(description = "Categories this product belongs to")]
    pub categories: Vec<String>,

    #[schemars(description = "Whether the product is currently in stock")]
    pub in_stock: bool,
}
Step 3: Generate JSON Schema
Now, let’s generate a JSON Schema from our type:
fn main() {
    // Create a schema JSON for our Product struct
    let schema = schemars::schema_for!(Product);
    println!("{}", serde_json::to_string_pretty(&schema).unwrap());
}
Deep Dive into schemars::JsonSchema
The heart of Schemars is the JsonSchema trait. Let’s look at what it does:
pub trait JsonSchema {
    fn schema_name() -> String;
    fn json_schema(gen: &mut SchemaGenerator) -> Schema;
}
When you derive JsonSchema for your type:
- Schemars implements this trait for your type
- The
schema_name()method returns a string identifier for your schema - The
json_schema()method generates a JSON Schema representation
Most types in the Rust standard library already implement JsonSchema, including:
- Basic types (
String,i32,bool, etc.) - Collection types (
Vec<T>,HashMap<K, V>, etc.) - Option types (
Option<T>)
Advanced Schemars Features
Custom Schema Attributes
Schemars provides many attributes to customize your schema:
#[derive(JsonSchema, Serialize, Deserialize)]
pub struct User {
    #[schemars(description = "User's unique identifier")]
    pub id: u64,

    #[schemars(pattern = r"^[A-Za-z0-9_]+$", min_length = 3, max_length = 30)]
    pub username: String,

    #[schemars(email)]
    pub email: String,

    #[schemars(range(min = 13))]
    pub age: u8,

    #[schemars(example = "admin")]
    pub role: String,
}
Schema Generation Options
You can customize the schema generation process:
use schemars::{gen::SchemaSettings, schema_for_value};

fn main() {
    let settings = SchemaSettings::default()
        .with_title("My API Types")
        .with_description("Schema for all types in this API")
        .with_metadata(btreemap! {
            "apiVersion".to_string() => json!("v1"),
            "category".to_string() => json!("documentation"),
        });

    let generator = settings.into_generator();
    let schema = generator.into_root_schema_for::<User>();

    println!("{}", serde_json::to_string_pretty(&schema).unwrap());
}
Enum Support
Schemars works great with Rust enums:
#[derive(JsonSchema, Serialize, Deserialize)]
#[serde(tag = "type", content = "data")]
pub enum Shape {
    #[schemars(description = "A circle defined by a center point and radius")]
    Circle { center: Point, radius: f64 },

    #[schemars(description = "A rectangle defined by two corner points")]
    Rectangle { top_left: Point, bottom_right: Point },

    #[schemars(description = "A line defined by two endpoints")]
    Line(Point, Point),
}

#[derive(JsonSchema, Serialize, Deserialize)]
pub struct Point {
    pub x: f64,
    pub y: f64,
}
Practical Example: API Validation
Let’s see a practical example of how Schemars can be used to validate API requests:
use schemars::{schema_for, JsonSchema};
use serde::{Serialize, Deserialize};
use jsonschema::{Draft, JSONSchema};
use serde_json::json;

#[derive(JsonSchema, Serialize, Deserialize)]
struct CreateUserRequest {
    username: String,
    email: String,
    age: u8,
}

fn validate_request(json_data: serde_json::Value) -> Result<CreateUserRequest, String> {
    // Get the schema for our request type
    let schema = schema_for!(CreateUserRequest);

    // Compile the schema
    let compiled = JSONSchema::options()
        .with_draft(Draft::Draft7)
        .compile(&serde_json::to_value(schema).unwrap())
        .map_err(|e| format!("Schema compilation error: {}", e))?;

    // Validate the incoming data
    if let Err(errors) = compiled.validate(&json_data) {
        let error_msg = errors
            .map(|e| format!("- {}", e))
            .collect::<Vec<String>>()
            .join("\n");
        return Err(format!("Validation errors:\n{}", error_msg));
    }

    // If valid, parse into our type
    serde_json::from_value(json_data)
        .map_err(|e| format!("Deserialization error: {}", e))
}

fn main() {
    // Valid request
    let valid_req = json!({
        "username": "jane_doe",
        "email": "jane@example.com",
        "age": 25
    });

    // Invalid request (missing email)
    let invalid_req = json!({
        "username": "john_doe",
        "age": 30
    });

    println!("Valid request: {:?}", validate_request(valid_req));
    println!("Invalid request: {:?}", validate_request(invalid_req));
}
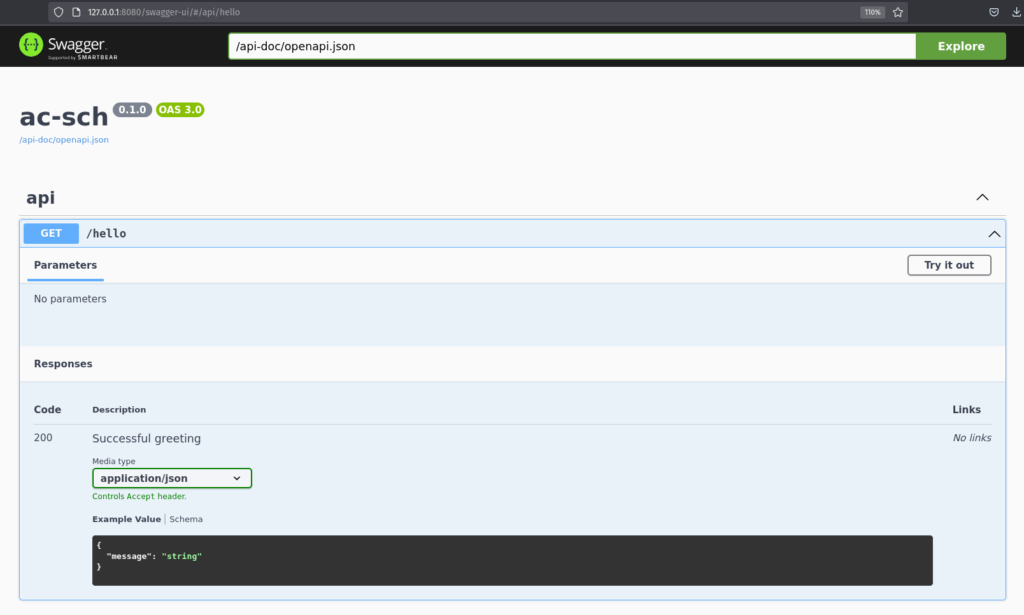
Integrating with Web Frameworks
Schemars works well with popular Rust web frameworks:
Actix-Web Example – with Swagger
Comparing with Vanilla Structs
To really understand the power of Schemars, let’s compare what happens with and without it:
Without Schemars
// Define a struct
struct User {
    id: u64,
    username: String,
    email: String,
}

// If you want to validate:
fn validate_user_json(json: &str) -> Result<User, String> {
    // You'd have to manually write validation logic
    let parsed: serde_json::Value = serde_json::from_str(json)
        .map_err(|e| format!("Invalid JSON: {}", e))?;

    // Manual field presence checks
    if !parsed.is_object() {
        return Err("Expected an object".to_string());
    }

    let obj = parsed.as_object().unwrap();
    if !obj.contains_key("id") || !obj["id"].is_u64() {
        return Err("Missing or invalid 'id' field".to_string());
    }

    if !obj.contains_key("username") || !obj["username"].is_string() {
        return Err("Missing or invalid 'username' field".to_string());
    }

    // Many more checks...

    // Finally parse
    serde_json::from_str(json).map_err(|e| format!("Parse error: {}", e))
}

// If you want to document your API:
// You'd have to manually write documentation, probably in OpenAPI/Swagger format
With Schemars
#[derive(JsonSchema, Serialize, Deserialize)]
struct User {
    id: u64,
    username: String,
    email: String,
}

fn validate_user_json(json: &str) -> Result<User, String> {
    let schema = schema_for!(User);
    let json_value: serde_json::Value = serde_json::from_str(json)
        .map_err(|e| format!("Invalid JSON: {}", e))?;

    // Validate with compiled schema
    let compiled = JSONSchema::compile(&serde_json::to_value(schema).unwrap())
        .map_err(|e| format!("Schema error: {}", e))?;

    if let Err(errors) = compiled.validate(&json_value) {
        return Err(format!("Validation errors: {:?}", errors));
    }

    // Parse into our type
    serde_json::from_str(json).map_err(|e| format!("Parse error: {}", e))
}

// Documentation is automatically generated from your types!
Best Practices for Using Schemars
- Combine with Serde: Always use Schemars with Serde for serialization/deserialization
- Add Descriptions: Use
#[schemars(description = "...")]to document your fields - Add Examples: Provide examples using
#[schemars(example = "...")] - Use Validation Constraints: Leverage attributes like
min_length,pattern, etc. - Version Your Schemas: When your API evolves, version your schemas
- Generate Documentation: Use the generated schemas to create API documentation
Conclusion
Schemars extends Rust’s type system by allowing your structs to generate their own JSON Schema definitions. This brings numerous benefits:
- Self-documenting code: Your data structures document themselves
- Validation: Enforce constraints beyond what Rust’s type system provides
- Interoperability: Share your data model with non-Rust systems
- API documentation: Automatically generate OpenAPI/Swagger docs
The next time you’re building an API in Rust, consider using Schemars to make your code more robust and your API more developer-friendly.
Resources
{
"$schema": "http://json-schema.org/draft-07/schema#",
"title": "MyStruct",
"type": "object",
"required": [
"my_bool",
"my_int"
],
"properties": {
"my_bool": {
"type": "boolean"
},
"my_int": {
"type": "integer",
"format": "int32"
},
"my_nullable_enum": {
"anyOf": [
{
"$ref": "#/definitions/MyEnum"
},
{
"type": "null"
}
]
}
},
"definitions": {
"MyEnum": {
"oneOf": [
{
"type": "object",
"required": [
"StringNewType"
],
"properties": {
"StringNewType": {
"type": "string"
}
},
"additionalProperties": false
},
{
"type": "object",
"required": [
"StructVariant"
],
"properties": {
"StructVariant": {
"type": "object",
"required": [
"floats"
],
"properties": {
"floats": {
"type": "array",
"items": {
"type": "number",
"format": "float"
}
}
}
}
},
"additionalProperties": false
}
]
}
}
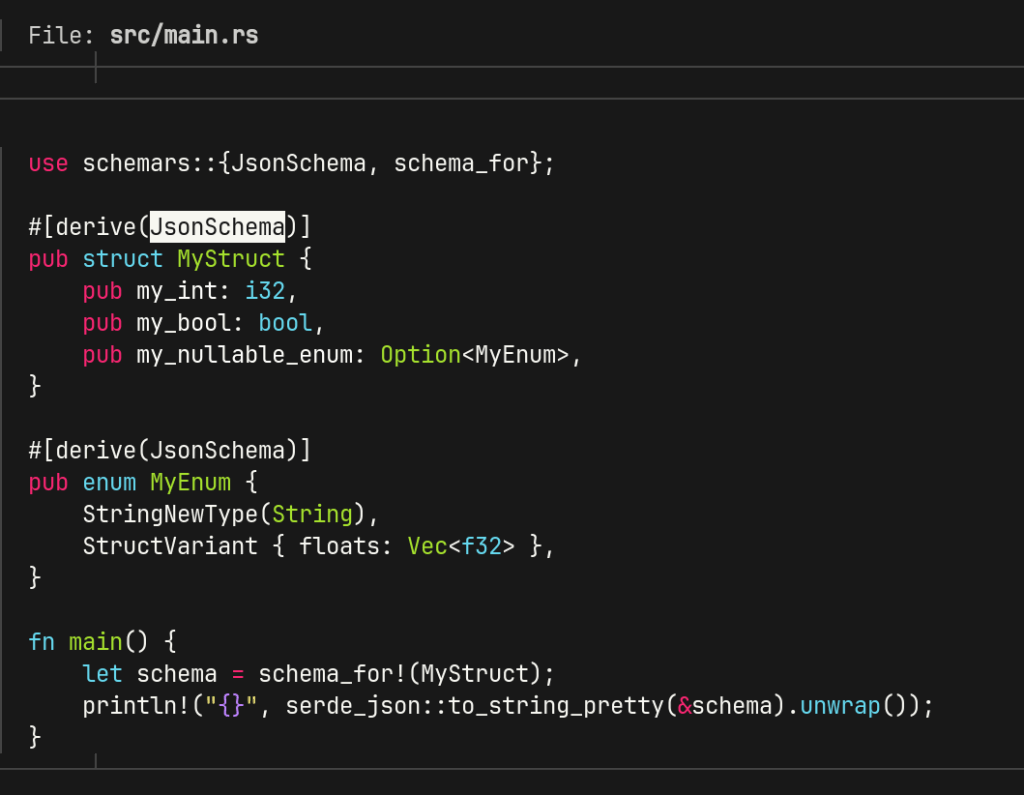
}Next steps :
This JSON is a JSON Schema auto-generated by Schemars describes the structure of a Rust data type (MyStruct with an optional enum MyEnum). Once you have this, there are a number of powerful things you can do with it next:

✅ What You Can Do With This JSON Schema:
1. Validate JSON Data
You can use this schema to validate JSON documents to ensure they conform to the expected structure.
- Example (in JavaScript with AJV):
const Ajv = require("ajv"); const ajv = new Ajv(); const validate = ajv.compile(schema); const valid = validate(jsonData);
2. Generate Forms
Use the schema to automatically generate HTML or React forms with libraries like:
3. Generate Code (Codegen)
Convert the schema into client models or types for TypeScript, Python, Java, etc.
- With
quicktypeor its CLI:quicktype --lang typescript --src-lang schema schema.json - Example TypeScript output:
export interface MyStruct { my_bool: boolean; my_int: number; my_nullable_enum?: MyEnum | null; } export type MyEnum = | { StringNewType: string } | { StructVariant: { floats: number[] } };
4. Generate API Documentation
Use tools like Swagger UI, Redoc, or Stoplight to render the schema as visual docs, especially when embedded in OpenAPI specs.
5. Schema-Based Testing
You can create random test data from the schema using:
json-schema-faker- Use this to generate dummy data for testing your API or front-end
Thanks for following along with this tutorial